

How To Tune Your Drum Set

Skillful tuning is foundational to getting a good drum tone. Equally with whatsoever instrument, it can have years to develop an ear for what a properly tuned bass, tom, or snare pulsate sounds like. That's why nosotros've put together this tuning companion. Packed with theory and helpful tips ranging from head seating to drum dampening to tuning by genre, this primer will help you become a better drum tuner past detailing the post-obit steps:
- Preparing the heads for installation
- Seating and tensioning the head
- Fine tuning the head
- Checking the sound
- Tuning tips for each particular pulsate
- Drum dampening tips & tricks
- Drum tuning accessories
What Is Proper Tuning, and Why Is It Important?
If you troll drum forums, you lot're leap to come across arguments near the "right" manner to melody this snare or that tom. The truth is, there is no right way to tune a drum; the right way is that which best suits the player and slice of music. That said, in that location are some physics and generally regarded best practices at play in getting a drum to perform at its peak. Hither are ii principles that concord truthful for virtually applications:
- Pure pitches audio best. This is especially true for toms. Our ears prefer a pitch we can sing. A caput that is fraught with dissonances from tension rod to tension rod can reduce a shell'southward resonant potential and make the drum less distinguishable in a mix.
- Better drums tune easier. Quality shells, begetting edges, and hardware yield a drum that tunes faster and stays at pitch.
Tuning Theory: How to Tune Your Drums
i. Preparing the Head
Most modernistic drums are equipped with two heads: batter (elevation) and resonant (lesser). For the purposes of this article, we'll start with the batter side. Remove the unused resonant head or silence it on your human knee or a carpeted surface. A product like the DW Tuning Tabular array, which resembles a carpeted Lazy Susan, is ideal for this purpose.
Detune all tension rods until the head and counterhoop spin freely; rods should be loose but nonetheless threaded into their lug casings. Tap the beat out and note its resonant frequency. Sing it. Record information technology. That's the pitch yous want to attempt to match. Twist the hoop back and forth until all tension rods are centered and upright. This will requite you the least resistance on the path to a pitch-perfect drum.
Finger-tighten the shaft of each tension rod until yous tin can't twist anymore. Lodge is non important at this stage; it just gives a common starting point. One time all rods are finger tight, start in with the drum cardinal.
Tip: Whether you're installing a fresh head or loosening ane that's already installed, we've plant the Tru Tuner head replacement system to be fast and dependable.
2. Seating and tensioning the head
Requite your starting tension rod two one-half-turns of a drum key. Then move across the head to the reverse rod and requite information technology two one-half-turns. Skip a rod (or two — see diagrams) counterclockwise, then give this pair of rods two half-turns. The goal is equal-tensioned pairs across the caput. If your vanquish and hoops are true and your lug threads well greased, you lot tin also utilise resistance every bit your guide. The Evans Torque Key detects this automatically.
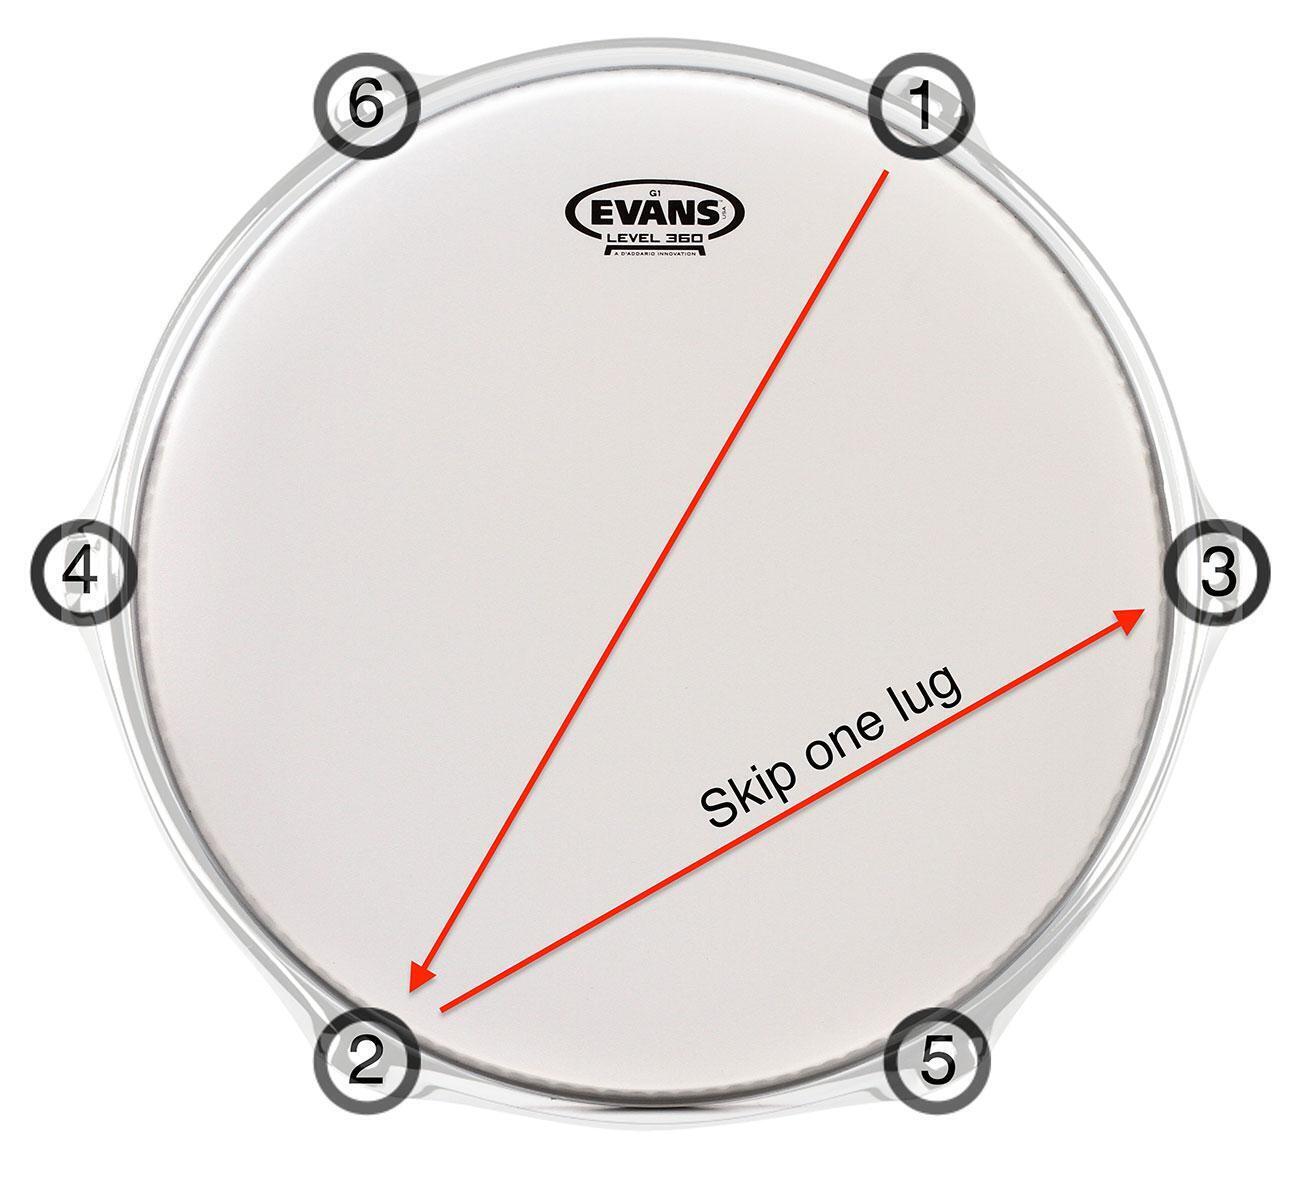
Six-lug tuning sequence.
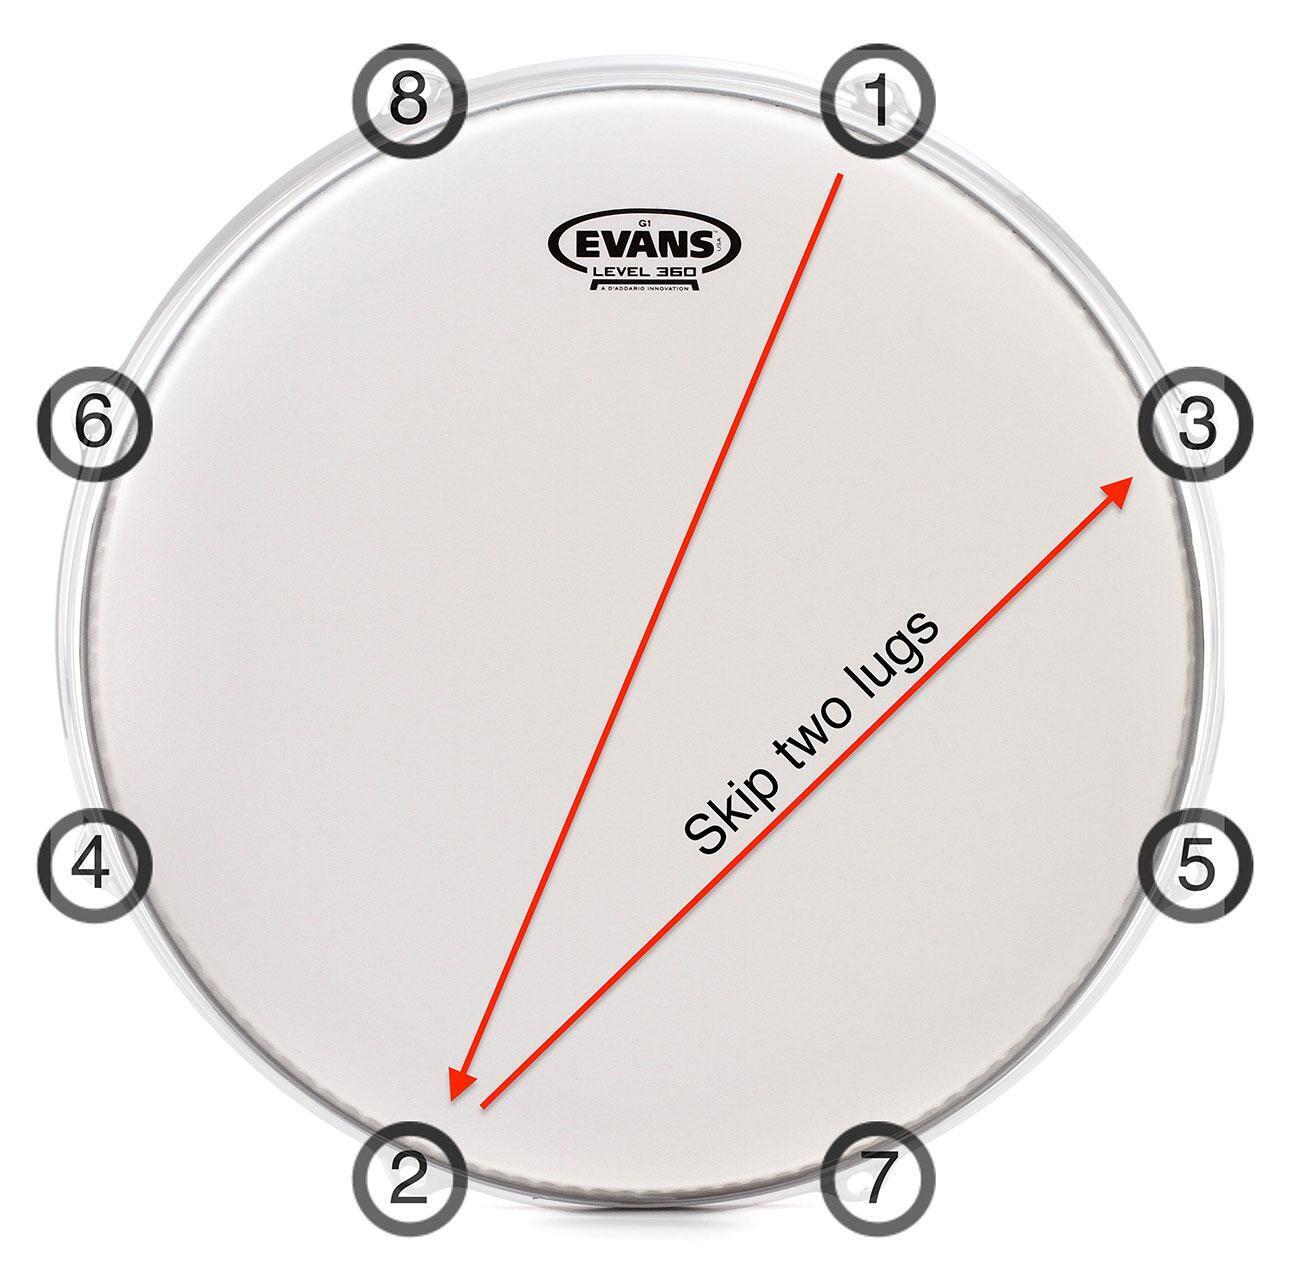
Viii-lug tuning sequence.
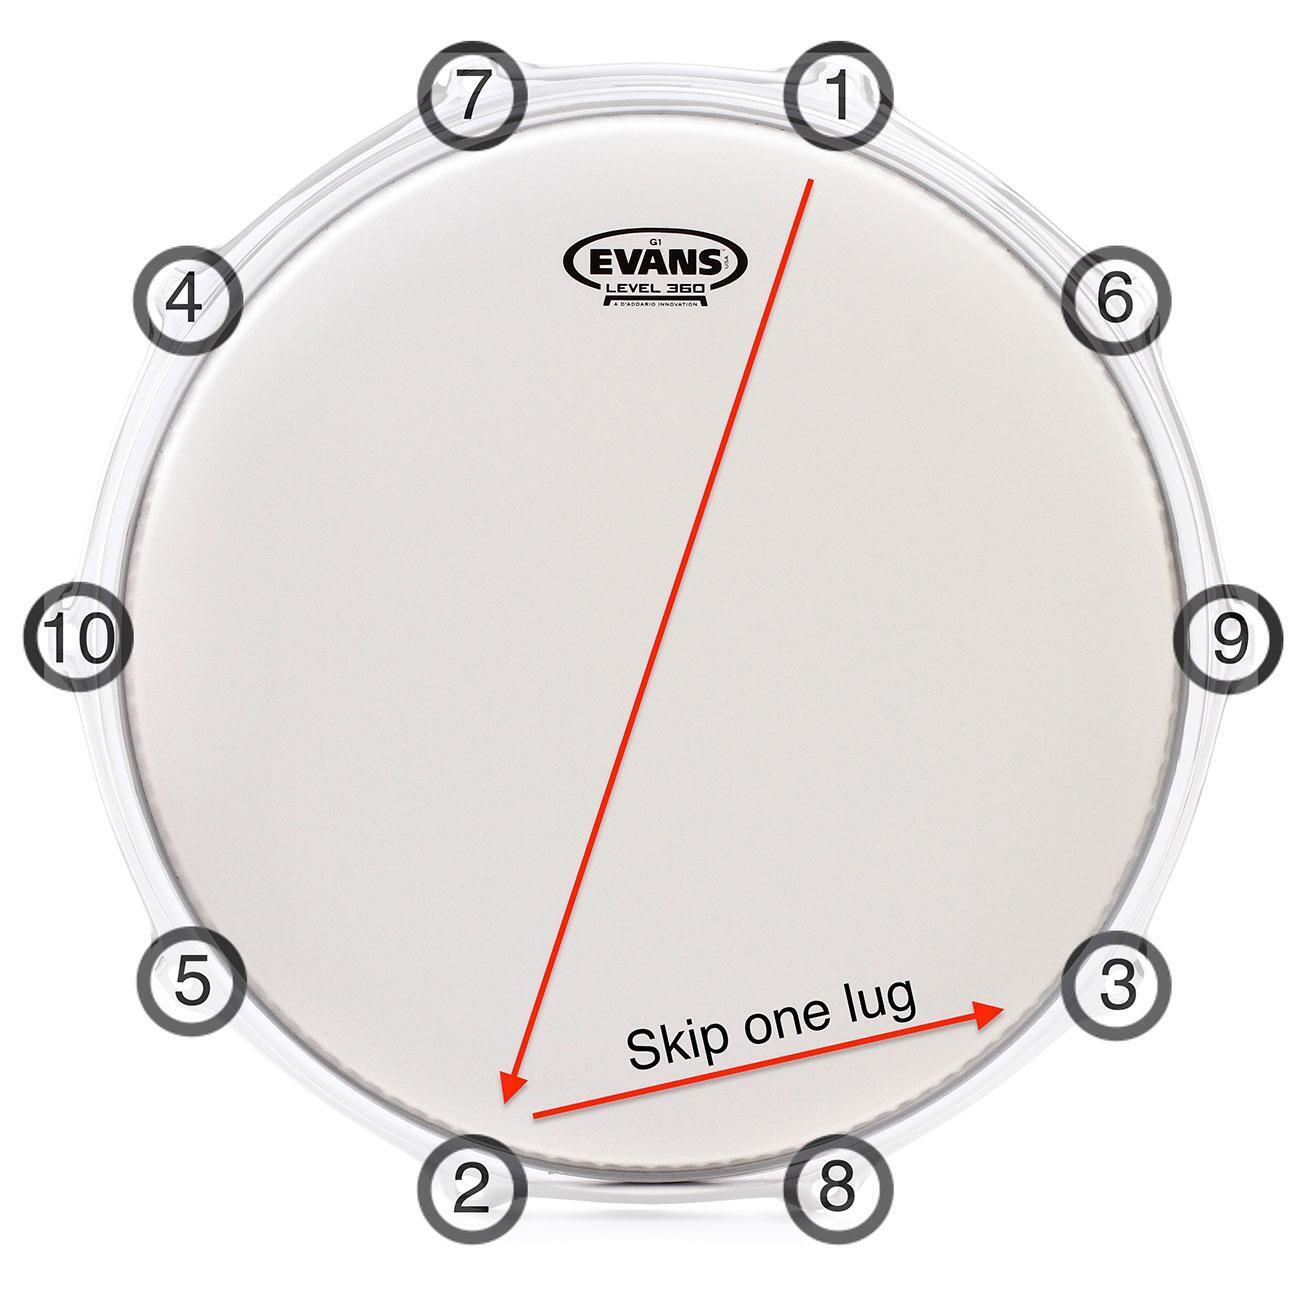
X-lug tuning sequence.
Echo this process until all tension rods are equally tensioned and the head'southward pitch closely matches the shell's resonant pitch. Regularly smooth out wrinkles using a soft cloth and apply gentle force per unit area to properly seat the head.
3. Fine tuning the head
In one case yous near your beat's resonant frequency, it'due south time to start fine-tuning. Tap the border of the head with your finger, about 2″ from the hoop, directly in front of whatsoever tension rod. Note the pitch; if you lot have trouble picking it out, you can balance a finger on the centre of the head to meliorate isolate the tone. Now tap in forepart of the side by side (neighboring) rod. Is information technology pitched college or lower than the first? Loosen or tighten to friction match. Proceed moving circularly around the head from rod to rod until all sections produce an identical pitch. If done right, you'll find the pulsate first to sing every bit you arroyo resonant frequency. Now flip the drum over and repeat with the resonant head. Aim for the same pitch or up to a minor tertiary (three one-half-steps) college or lower than the batter head. Adjust to taste.
4. Checking the Audio
Note that everything we've touched on so far has been tuning theory, and that not all shells and drum types are created equal. If the sound you hear after carefully tuning both heads isn't working, don't be afraid to experiment. Raise or lower the concoction head a whole tone. Detune just 1 rod. Try some muffling (see dampening tips below). With patience and care, your reward will be a drum that inspires y'all, responds the way you want, and suits the music you play.
v. Tuning tips for each particular drum
Bass drum
You might notice that intonation is far less important with kicking drums, since near often you lot're looking for punch and low end rather than a pure tone. Start with the concoction head and tighten to just above wrinkle*, or to where the drum starts feeling right underfoot. Y'all'll want to feel the beater sink in and not rebound too easily and then as to prevent unwanted double-strokes. Then get effectually to each tension rod, starting from the meridian, tightening and loosening and noting what each screw does for attack (looser) and tone (tighter). Once y'all've got the batter head dialed in, the front end head is pretty forgiving. You can use this to dispense notation length and bass frequency — lower or higher, shorter or longer, etc.
*Notation: This selection is personal and fashion dependent. Jazz players, for example, similar their bass drums to sing more than. Don't be agape to crank your kick drum if it suits the music.
Bass drum heads
 The Evans EMAD Clear is a get-to batter caput for many modernistic drummers. It makes just most any kick drum, of any size or quality, mic upward like a rock record. The Aquarian Deep Vintage II is good for more of a Keith Moon vibe, and the Remo Powerstroke 3 Coated is good for that Chad Sexton wet-scooped-and-punchy thing. For jazz and soul, a single-ply coated batter head, like the Remo Ambassador Coated, will ameliorate highlight the natural tone of your kick drum with a clearer, more defined pitch. As for resonant heads, the Evans Calftone series is handsome and affordable. The DW Microvent heads are nice, as well, for breathability without a traditional port hole.
Toms
Start with a tom'due south batter head tuned to resonant pitch, so enhance and lower the tension until you lot hear the pulsate first to speak. Movement on to the reso head and aim for about a whole tone higher than the acme. Adjust to taste. The 2 heads piece of work together in concert, so constantly check dorsum and along for symbiosis.
Tom heads
For tom batters, you can't go wrong with a thin 2-ply coated head like the Evans G2. Clear heads practice tend to feel better from backside the kit, merely tin can sometimes run into too "sproingy" under miked weather. For reso heads, the Evans Resonant Glass and Reso 7 are both pretty neutral and offer good control.
Snare drum
The Nick D'Virgilio arroyo to snare tuning is to creepo up the snare-side head and arrange the concoction head to taste. This gives y'all a tight, controlled snare response even if you prefer your top head swampy.
For the snare side, tune up until the head just starts to sound choked, then back off a half-plow or so. You can slide a stick underneath the snare wires to mute them while yous tune. Just exist careful — those thin snare-side heads can pull if you go too far.
For the batter side, run across Nick's technique here.** Tune your batter head medium to medium-high until you detect the body, attack, and tension yous're after. Then, with the snare positioned at the kit, detune the lesser-left 3 tension rods. Endeavor a but-above-wrinkle detune on the rod straight under where your stick drops, then experiment past dropping tension immediately to the right and left. If your pitch drops too much, you tin can compensate by tuning upwardly the tension rods opposite the loose ones. This gives you warmth, stick response, and a dry tone that doesn't require a ton of muffling.
**Important: Some drummers merits this method tin can damage shells and hoops. Use caution.
Snare heads
 The classic snare combo is a unmarried-ply coated batter head with a wafer-thin clear snare-side head. For this pairing, the 2-piece Remo Ambassador Propack is user-friendly and saves some bucks. The dual-ply Emperor Coated batter caput is another classic, or for a heartier punch, check out the reverse-dot Emperor X. The 3-ply Aquarian Triple Threat is adept for that triggered type of snare sound. On the other end of the spectrum, the Dunnett Res-O-Tone, with its seven.5-mil tympani-like film, is built thinner for a more faithful shell tone.
6. Drum dampening tips & tricks
Especially where mics are involved, information technology's hard to become that fat, controlled, focused sound without a touch of treatment. Fortunately, dampening (likewise known as muffling) products and solutions abound today. Here are some of our favorite methods for treating snares, toms, and bass drums.
Snare drum dampening
- Moongel — RTOM Moongel makes a great dampener and adheres to heads to spot-treat overtones, offering even better control than record and cloth, only with less loss of tone and volume. Moongel volition last yous several years and through numerous applications if y'all have care of it. Clean with rubbing alcohol or rinse under the tap to wash away residue and reactivate the stickiness.
- Rings — These thin, pre-sized muffling rings for toms and snare drums include Remo Command Rings, Evans E-Rings, and the Big Fat Snare Drum Steve'due south Donut. No adhesion is required. Just remainder rings on your heads and bask a more focused sound without much fuss. They're also useful for writing out gear up notes and lists.
- Old drumhead — After changing your concoction head, place the sometime caput upside downwards right on top. Non simply does it massively deaden the tone, but it also drops the pitch several semitones for that Rumours-esque fatness and dryness.
- The wallet — Resting a wallet on the snare'due south batter head can really focus the sound and bring out its punch. Yous'll lose book, but if yous're shut-miking the drum, this should be no major concern. Utilize a foursquare of double-sided adhesive or hook-and-loop tape if you want to secure it in place.
- Bandana — This tip comes from Cody at Sounds Similar a Pulsate. Fold a standard square handkerchief in half, into a triangle shape. Drapery the folded fabric over about half of the snare concoction with the betoken facing abroad from you. Drive a drum primal into the fabric over a tension rod to secure information technology in place. Now yous can coil the handkerchief up to attain varying degrees of muffling. Very quick, very handy, and very effective.
- Record and cloth — Excess ring? Tap your drum with a stick while tracing effectually the edge with your finger, near 2″ from the hoop. You'll eventually land on a spot where the overtones are minimized. Secure a piece of a duct tape or gaffer tape to that spot, or if the ring persists, tape down a slice of material. Old shirts and paper towels work nifty.
- Dish towel/T-shirt — This one comes at a massive reduction in book, but information technology may be simply the sound you lot're subsequently. Simply drape a dish towel or T-shirt over the batter side of your snare drum. You can secure it to the beat out with a big rubber ring or bungee cable if yous like. Just brand sure the fabric stays in contact with the drumhead. Instant '70s sound!
Tom dampening
A pat or two of clear Moongel on the concoction head usually corrects any unwanted overtones and sympathetic resonances in toms. A touch on the reso head tin sometimes zap errant band every bit well. The trick is in experimenting with where you place the gels. An inch in from the counter hoop is a good starting place. Attempt different lug regions and dissimilar amounts until yous achieve desired results. For a deader sound, a set of Evans E-Rings or Remo Tone Control Rings works neat.
Bass drum dampening
When you need control for your kick drum, it's hard to trounce the internal pillow. The big-box store bed size works just fine. You might as well consider the Pearl Bass Drum Muffler, which looks dainty, is the right size for most bass drums 18″ and larger, and offers a proficient range of command. Towels, blankets, and home insulation are constructive besides. For subtler dashes of ring repellent, a strip of felt stretched between the reso head and hoop is tried and true.

Snare Sounds by Genre: A Reference
An ear for "good" drum tone takes years to develop. Here are some guidelines to get you in the ballpark:
- Pop rock: crisp and defined
- Difficult rock and power ballads: big and lively
- Modern rock: beefy, manlike
- '60s and '70s rock: splatty, muted
- Classic state: loose and bassy
- Mod country: woody, cutting
- Folk: snappy, polite
- Punk and hardcore: sharp, abrasive, ringy
- Black and doom metallic: deep and dead
- EDM: crunchy, assuming
- Hip-hop: percussive, immediate
- Dejection/R&B: fast and punchy
- Dance hall, reggae: tight and lingering
 7. Drum tuning accessories
Defended drum tuners tin can really streamline frequent head changes. These tools mensurate the tension or pitch past each tension rod, and so you tin reproduce your favorite tunings every fourth dimension you tune up. 2 good options are the DrumDial, which is all mechanical and requires no batteries, and the digital Overtone Labs Tune-Bot, which saves 50 settings across five different drum kits.
Decision
We hope this commodity has empowered and inspired yous to dive into your next tuning projection. Like drumming itself, tuning takes years to primary, and yous won't get better unless yous practice. Call your Sweetwater Sales Engineer at (800) 222-4700 to learn more than about whatsoever of the products referenced here.
Source: https://www.sweetwater.com/insync/how-to-tune-drums/
0 Response to "How To Tune Your Drum Set"
Post a Comment